OrcaSlicer hides many settings until you change the option mode. This lesson, tested in OrcaSlicer 2.4.2 on macOS, shows how to use OrcaSlicer advanced mode: where the slider is, what each position adds, how to read the new Speed tab, and what changing the outer wall speed does to the slicer's estimate.
Where is the option mode slider in OrcaSlicer?
Start on the Prepare tab with a model on the plate. We used the same two overhang-t parts as in the earlier lessons, with the Creality Ender-3 V3 SE printer, Creality Generic PLA filament and the 0.20mm Standard Process preset. If the Process panel is new to you, the Quality tab lesson explains it.
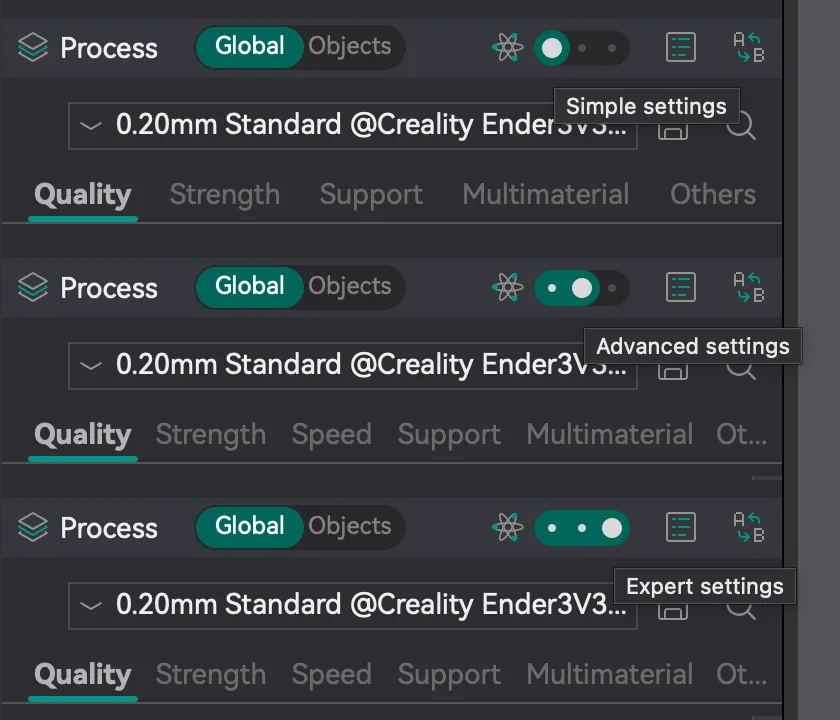
Look at the Process row in the left panel. To the right of the Global and Objects switch there is a small atom icon followed by a slider with three positions. Hover over each position for a second or two and a tooltip names it. The first click on a button sometimes only shows its tooltip in our setup, so hover first and then click.
- First position: Simple settings. This is where the app started.
- Second position: Advanced settings.
- Third position: Expert settings.
Click a position and the panel redraws at once.
What does Advanced mode add?
In Simple mode the Process panel has five tabs: Quality, Strength, Support, Multimaterial and Others. Advanced and Expert show six: Quality, Strength, Speed, Support, Multimaterial and Others. The last label is cut off to Ot... in the narrow panel, so widen the panel if you want to read it in full.
The Quality tab changes too. In Simple mode it has four groups: Layer height, Seam, Precision and Walls and surfaces. In Advanced mode a Line width group appears straight after Layer height, with these fields and values for our preset: Default 0.46, First layer 0.46, Outer wall 0.42, Inner wall 0.45, Top surface 0.42, Sparse infill 0.45, Internal solid infill 0.42, Support 0.38 and Bridge 100%. The Seam group moves down below it.
We then compared Advanced with Expert. The tab row was the same, the top of the Quality tab was the same, and the Speed tab showed the same groups and values. We did not open every tab in both modes, so we cannot list what Expert adds elsewhere, and we did not open the Others tab at all. The what is a slicer guide covers the general idea of presets if you want background.
What is on the Speed tab and what are the defaults?
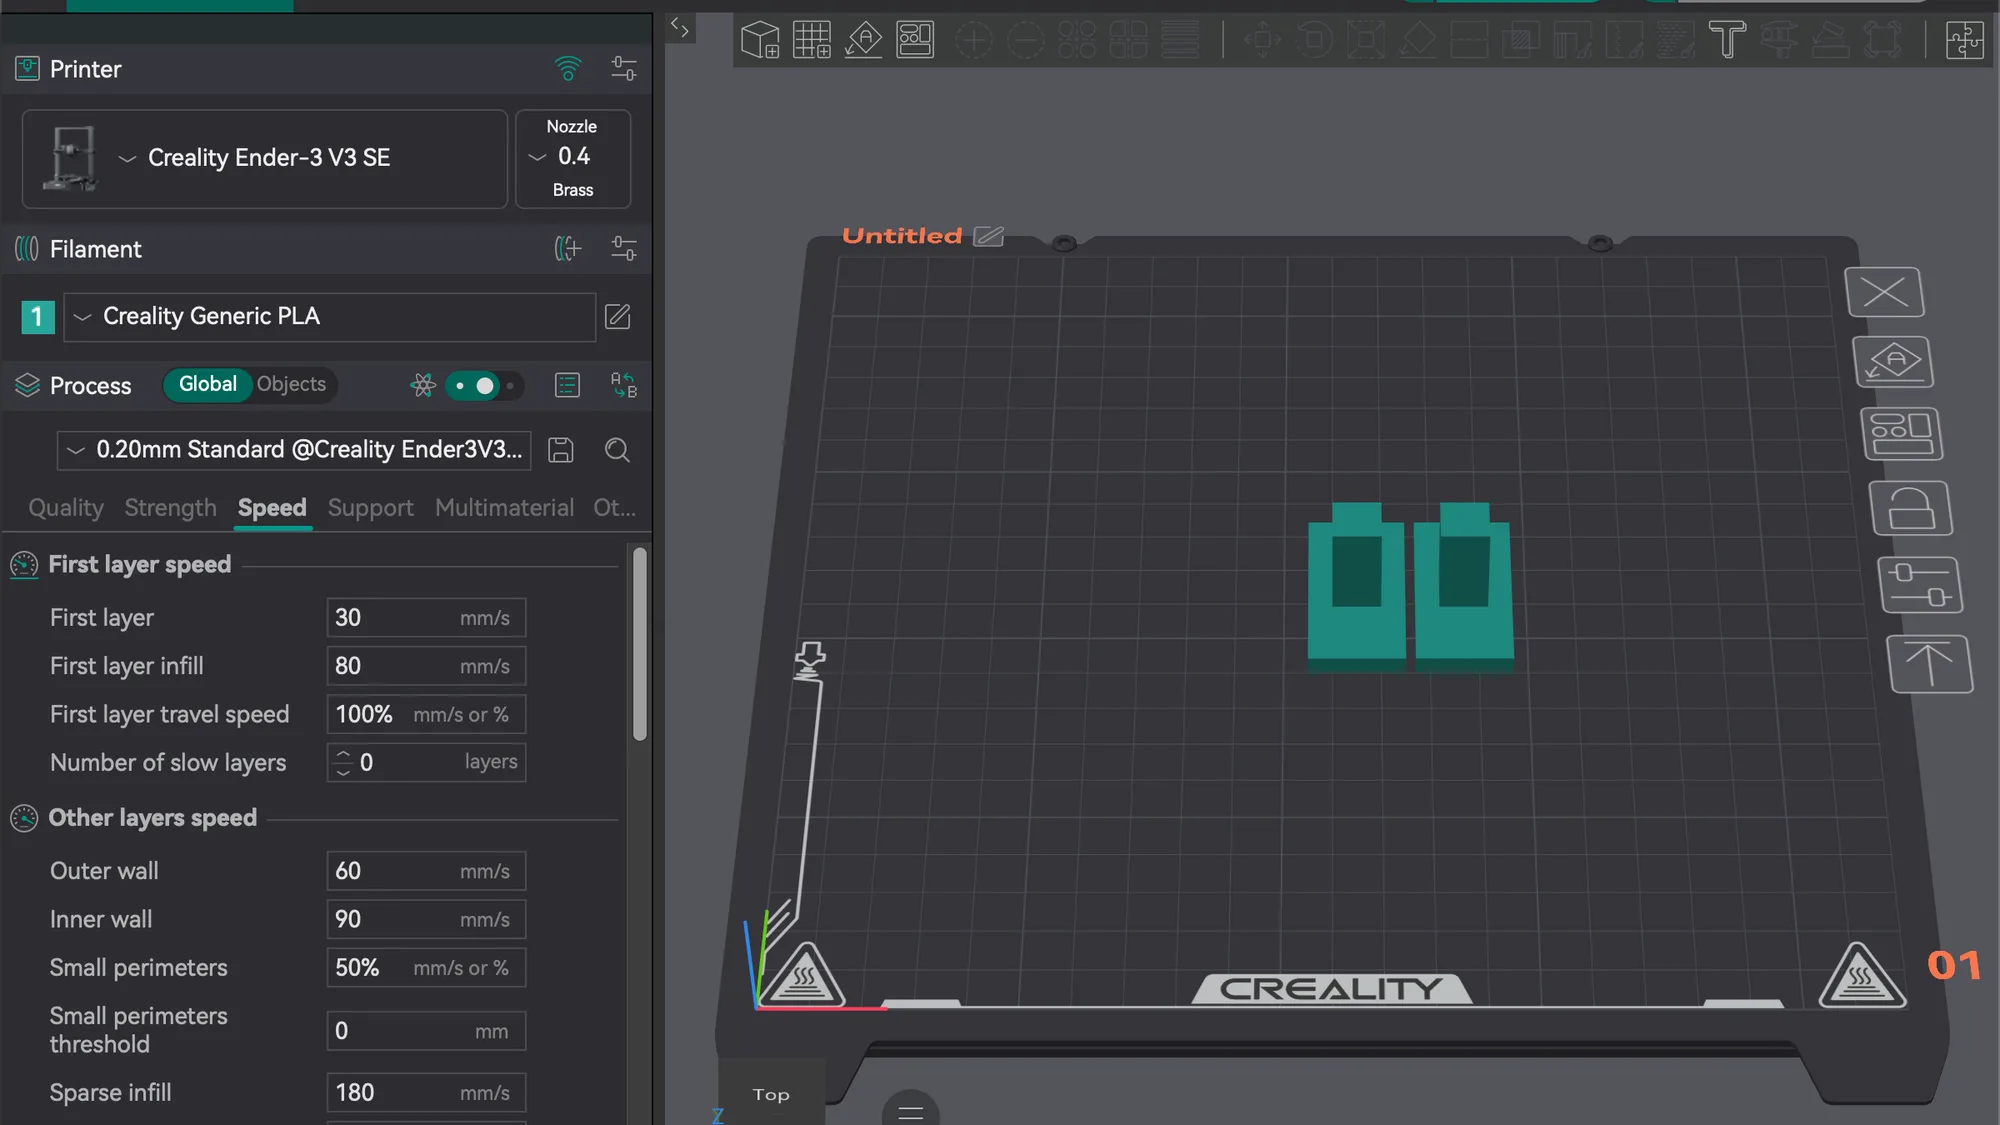
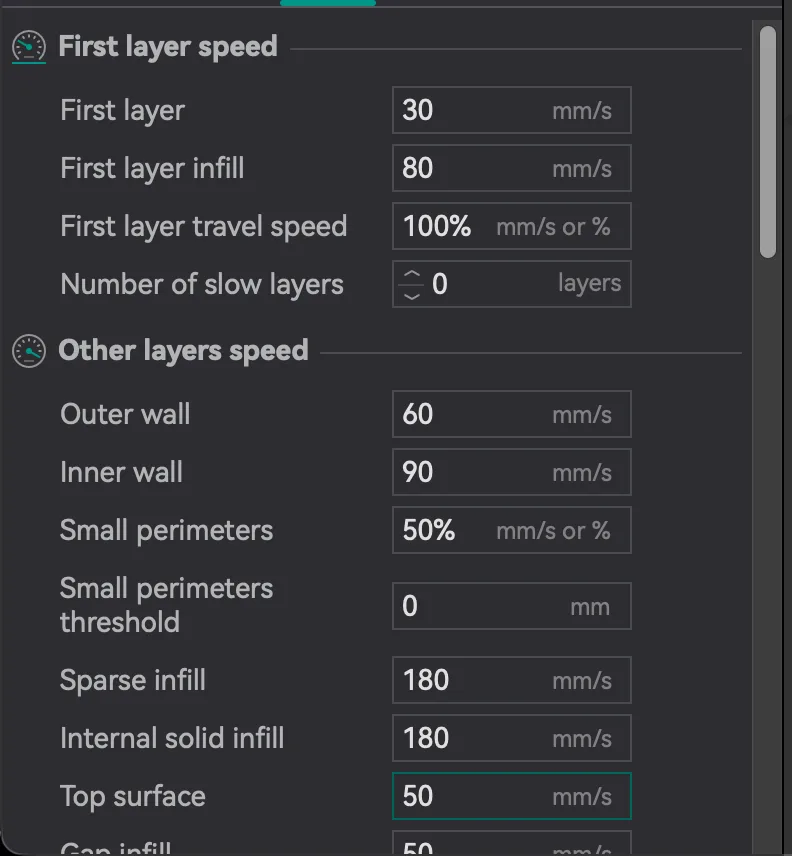
Click Speed. The panel scrolls, so drag the scroll bar at the right edge of the panel to see everything. In Advanced mode we found these groups, top to bottom, with the values of the 0.20mm Standard preset:
- First layer speed: First layer 30 mm/s, First layer infill 80 mm/s, First layer travel speed 100%, Number of slow layers 0.
- Other layers speed: Outer wall 60, Inner wall 90, Small perimeters 50%, Small perimeters threshold 0 mm, Sparse infill 180, Internal solid infill 180, Top surface 50, Gap infill 50, Support 50 and Support interface 80, all in mm/s unless shown.
- Overhang speed: Slow down for overhangs (ticked), Slow down for curled perimeters (unticked), four Overhang speed rows for 10%, 25%, 50% and 75% overhang (0, 20, 15 and 10 mm/s or %), and two Bridge rows, External 100 mm/s and Internal 150%.
- Travel speed: Travel 150 mm/s.
- Acceleration: Normal printing 2500, Outer wall 1000, Inner wall 2000, Bridge 50%, Sparse infill 100%, Internal solid infill 100%, First layer 500, First layer travel 100%, Top surface 2500 and Travel 2500, in mm/s squared or percent.
- Junction Deviation: 0 mm. Jerk(XY): Default, greyed out and showing 0. Advanced: Extrusion rate smoothing, 0.
Hover over a field for about two seconds to read its tooltip. Each one ends with a parameter name and a default value, which is the value stored in the preset. The ones we read:
- First layer: "This is the speed for the first layer except for solid infill sections." Parameter
initial_layer_speed, default 30 mm/s. - First layer infill: "This is the speed for solid infill parts of the first layer." Parameter
initial_layer_infill_speed, default 80 mm/s. - Outer wall: "This is the printing speed for the outer walls of parts. These are generally printed slower than inner walls for higher quality." Parameter
outer_wall_speed, default 60 mm/s. - Inner wall: "This is the speed for inner walls." Parameter
inner_wall_speed, default 90 mm/s. - Sparse infill: "This is the speed for internal sparse infill." Parameter
sparse_infill_speed, default 180 mm/s. - Travel: "This is the speed at which traveling is done." Parameter
travel_speed, default 150 mm/s.
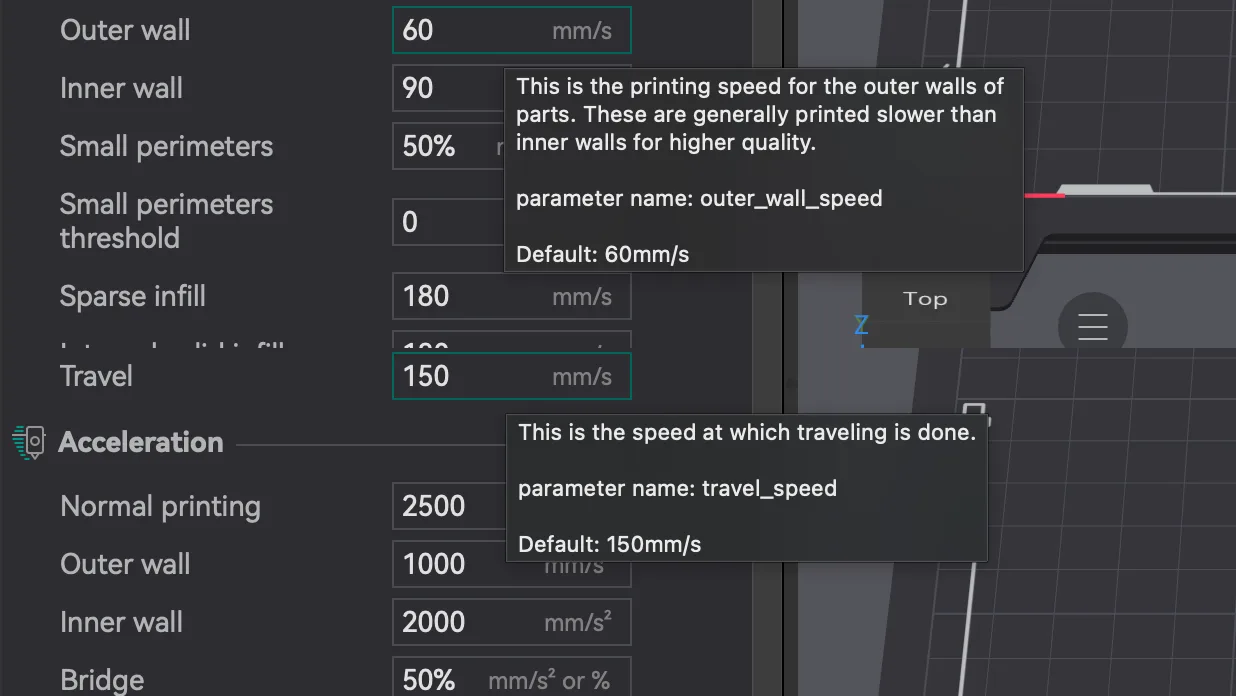
Read the numbers as a pattern. The outer wall is the slowest of the walls, the sparse infill is the fastest of the extrusions, and the first layer is slower than anything else. The tooltip for the outer wall says why: it is the surface you see. Our guide to print speed vs quality goes into the trade off in general.
How does outer wall speed change the slicer estimate?
We sliced the same plate six times in Advanced mode, changing only the Outer wall field. To change it, click the field, select the contents with Cmd+A, type a number and press Tab. The field label and the Speed tab name turn orange and a reset arrow appears beside the field and beside the preset name. Then click Slice plate. You can stay on the Speed tab while the plate slices, because the left panel stays in place on the Preview tab. If the button only shows a tooltip, click it again. We read the Total estimation box and the Outer wall row of the Line Type table. We left every other setting at its default.
| Outer wall speed | Outer wall row time | Estimated total time | Estimated filament |
|---|---|---|---|
| 30 mm/s | 6m59s | 28m23s | 6.70 g |
| 45 mm/s | 6m6s | 27m37s | 6.70 g |
| 60 mm/s (default) | 5m42s | 27m15s | 6.70 g |
| 90 mm/s | 5m22s | 26m55s | 6.70 g |
| 120 mm/s | 5m14s | 26m48s | 6.70 g |
| 150 mm/s | 5m11s | 26m46s | 6.70 g |
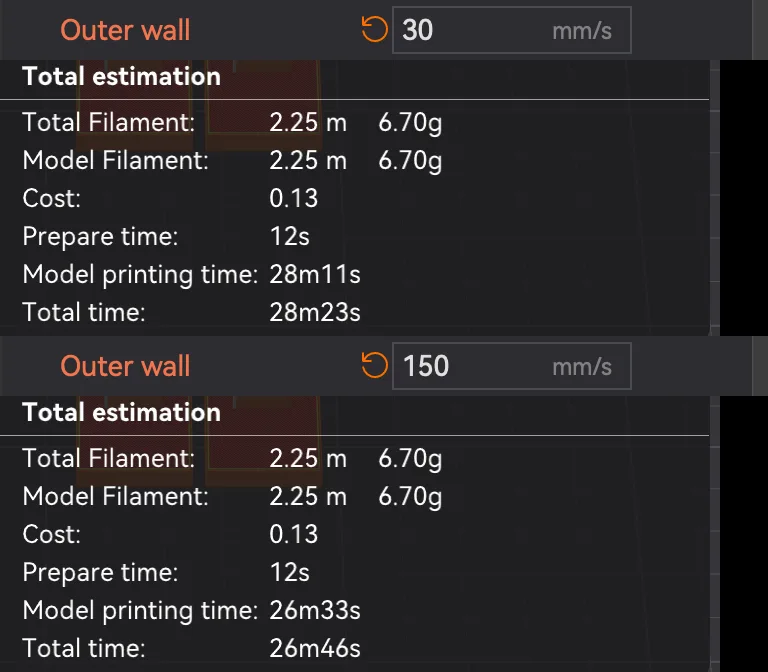
Reading the table: halving the speed to 30 mm/s added 1m08s, about 4 percent, to the total. Raising it to 150 mm/s, two and a half times the default, saved 29 seconds, about 2 percent. Between 120 and 150 mm/s the estimate moved by only 2 seconds. Filament did not change at all, which makes sense because the slicer lays down the same path either way. We did not investigate why the curve flattens. The Speed tab also holds Acceleration values, and the slicer's own limits may be part of it, but that is a guess and not something we tested.
These figures say nothing about print quality, strength or whether the Ender-3 V3 SE can actually print the outer wall at 150 mm/s, because this lesson only slices. They only show that for this plate the time cost of a slow outer wall is modest. After the last run we typed 60 back into the field. The orange marks cleared, and the preset name returned to its normal colour.
How do you go back to Simple mode?
Hover over the first position of the slider and click it. The Speed tab disappears from the tab row and the Line width group disappears from the Quality tab once you are back in Simple mode. We reset our outer wall field to the default before switching, so the preset was back to its original values. The next lesson, orca-slicer-supports, covers support settings. If you have not yet read the previous lesson, the walls and infill lesson shows the Strength tab.
Next lesson: Orca Slicer Supports: Enable, Tune and Paint Them.