How to Fix Elephant's Foot on 3D Prints
Elephant's foot is a flared bottom edge caused by a squished first layer. Fix the Z offset and bed heat first, then use elephant foot compensation in the slicer.
By Sepehr Sabbagh-pour · Published · 3 min read
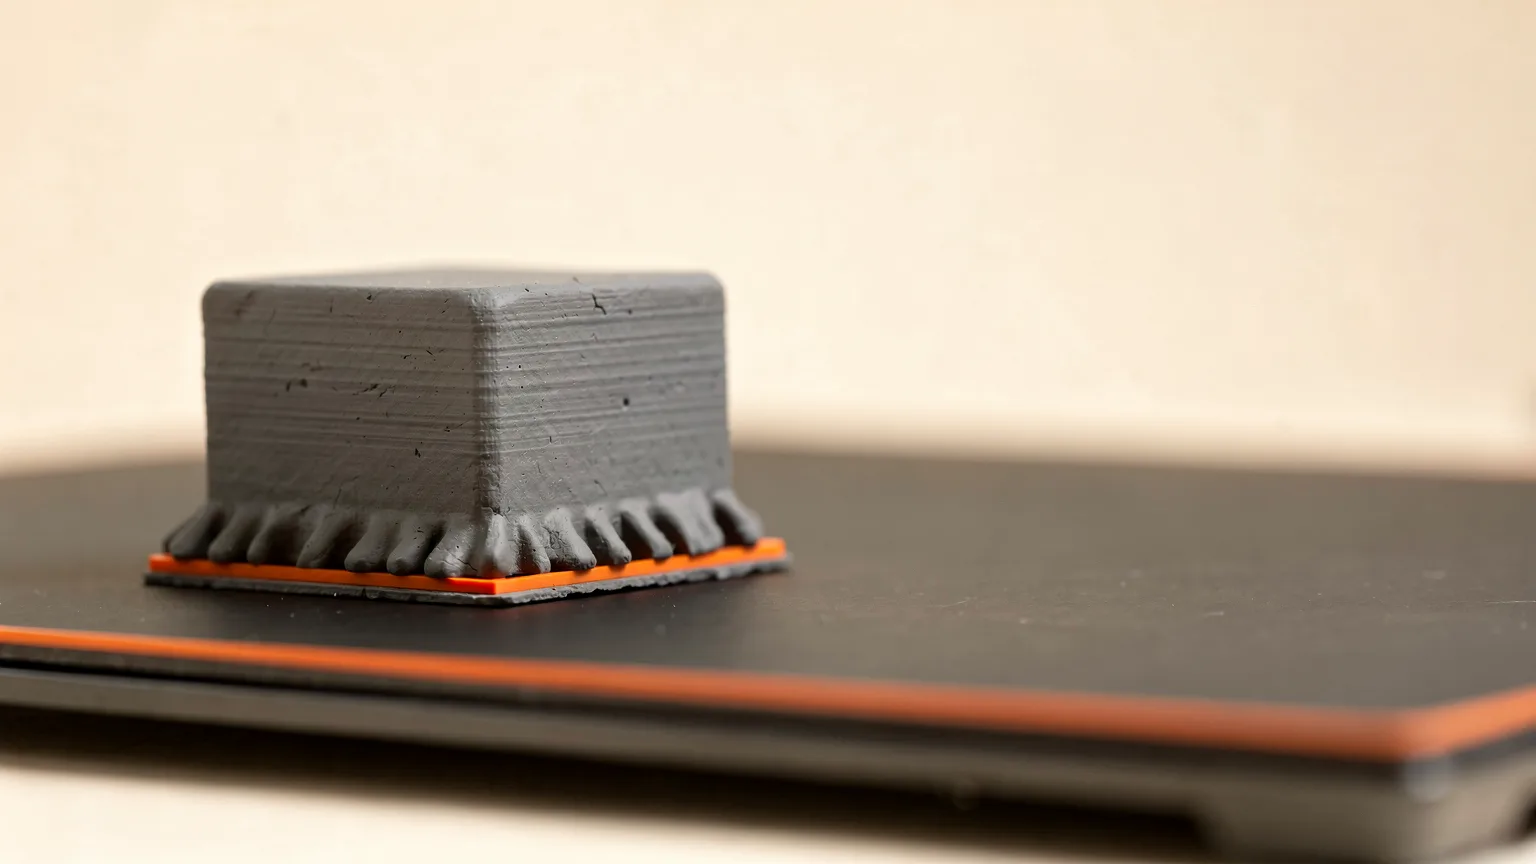
Elephant's foot is the bulge or flare at the bottom of a print, where the first few layers are wider than the rest. It looks like the base of an elephant's leg. For decorative parts it is cosmetic. For parts that must fit together, such as lids, press-fits and brackets, it can stop them assembling. This 3D printing guide covers the causes and the fixes, in the order to try them. It is based on maker documentation rather than our own tests, so settings are starting points.
| What you see | Likely cause | Fix |
|---|---|---|
| Flared bottom edge, rough or shiny squashed first layer | Nozzle too close to the bed | Raise the Z offset a little |
| Flare even with good Z height | Bed too hot, soft lower layers | Lower bed temperature within the filament range |
| Small flare, tight tolerances | Normal first-layer squish | Elephant foot compensation in the slicer |
What causes elephant's foot
Prusa describes it simply: the first layer is squished against the heated bed, so it ends up a bit wider than it should be. OrcaSlicer's documentation lists four contributors: the weight of the material above the first layers, thermal expansion of the material, a bed temperature that is too high, and inaccurate bed height or leveling.
Bambu Lab's first-layer guide gives a visual cue for the height problem. If the line is squished to the point of creating raised edges, or the nozzle drags, the nozzle is too low.
1. Check the first layer height
This is the most common cause and the cheapest to fix. Prusa's troubleshooting advice is to avoid compensating for a lack of adhesion by lowering the live Z adjustment and squishing the first layer. It warns that if lowered too much, the nozzle can damage the steel sheet and cause excessive vibration. Raise the Z offset in small steps, then reprint a small test. See how to fix a bad first layer and the bed leveling guide. If your printer has auto calibration, calibrating the printer can correct a drifting nozzle height.
2. Lower the bed temperature
A hot bed keeps the lowest layers soft, so they sag and spread under the weight above. OrcaSlicer lists a bed temperature that is too high as one cause. Drop it in small steps, staying inside the range printed on the filament spool or maker profile, until adhesion starts to suffer, then go back up one step. Lowering the bed too far trades elephant's foot for the problems in print not sticking.
3. Use elephant foot compensation in the slicer
Most slicers can shrink the first layer slightly so the squished result lands at the right size.
- PrusaSlicer: Print Settings, Advanced, Elephant foot compensation (visible in Advanced or Expert mode). Prusa says values around 0.2 mm usually work well for the default 0.4 mm nozzle. The adaptive version in PrusaSlicer 2.2 and newer detects thin lines in the first layer so they are not over-shrunk, and Prusa's official profiles ship with it enabled.
- OrcaSlicer: Quality, Precision, Elephant foot compensation. You enter a negative distance that is applied to a number of first layers. The compensation tapers linearly over those layers, and the wiki's example uses 0.25 mm.
- Cura: the Initial Layer Horizontal Expansion setting. Its definition in the Cura source says a negative value can compensate for squishing of the first layer known as elephant's foot. The default is 0.
If a brim looks disconnected from the part in the preview, that is expected, because the preview does not show the compensation. If the brim fails to connect on the real print, Prusa says your compensation value is likely too high.
4. Design around it when fit is critical
For parts that must mate, a small chamfer on the bottom edge of the model gives the flare somewhere to go. This is general modeling practice rather than something taken from a maker page, so check the result on your own printer. For general layer settings, see layer height explained.
Quick confirmation. Print a 20 mm cube or a short test piece and measure the width at the base and 5 mm higher with calipers. If the two readings match, the flare is gone. If the base is still wider, adjust one thing at a time: Z offset, then bed temperature, then compensation.
Frequently asked questions
What is elephant's foot in 3D printing?
It is a bulge at the bottom of a print where the first layers are wider than the rest. Prusa explains that the first layer is squished against the heated bed and so ends up wider than intended.
What compensation value should I use for elephant's foot?
Prusa says values around 0.2 mm usually work well for a 0.4 mm nozzle in PrusaSlicer. If the brim fails to connect to the part, the value is probably too high. Treat it as a starting point and adjust.
Does bed temperature cause elephant's foot?
It can contribute. OrcaSlicer lists a bed temperature that is too high among the causes, because the lowest layers stay soft and spread. Lower it in small steps within the filament's recommended range.
Is elephant's foot a problem for every print?
No. Prusa notes that for many applications it is not an issue. It matters when parts need precise dimensions or tight tolerances.
Sources

Founder and editor
Software engineer since 2009 and Head of Engineering by day, a maker who has owned several 3D printers, writing practical guides to 3D printers, filament and running costs, with every article saying what was and was not tested.
Drafted with AI assistance, then edited and reviewed by Sepehr before it goes live. How we use AI.
Keep reading
 AI illustration
3D Printer Problems and Fixes: A Troubleshooting Guide
A symptom-first guide to common 3D printer problems: what causes them and what to try first, based on manufacturer…
 AI illustration
How to Fix Blobs and Zits on 3D Prints
Blobs and zits in 3D printing come from the seam and from oozing. This research-based guide covers seam placement, scarf seams…
 AI illustration
How to Fix Ghosting and Ringing
Ghosting in 3D printing, also called ringing, is an echo of sharp edges caused by vibration. This research-based guide covers…